How-to Create a Cinematic Portrait With Hard Light
- Jeff Carpenter
- Aug 28, 2020
- 3 min read

The inspiration for this shot actually came from a Netflix show that I watched awhile back called "What If" starring Renée Zelwegger. The premise for the show doesn't really matter in this case, but It was pretty good and I highly recommend it. The thing I found really cool was the image promoting the show, so I thought I would try to recreate it. Rather than just copying it, I wanted to put my own spin on it and make it unique to my style.
The part of the image that really caught my eye was the sliver of light on her face that made it look like a door was partially cracked with some light coming through. This is the part that I really wanted to replicate. To find out how, keep on reading!
The Breakdown


The Lights
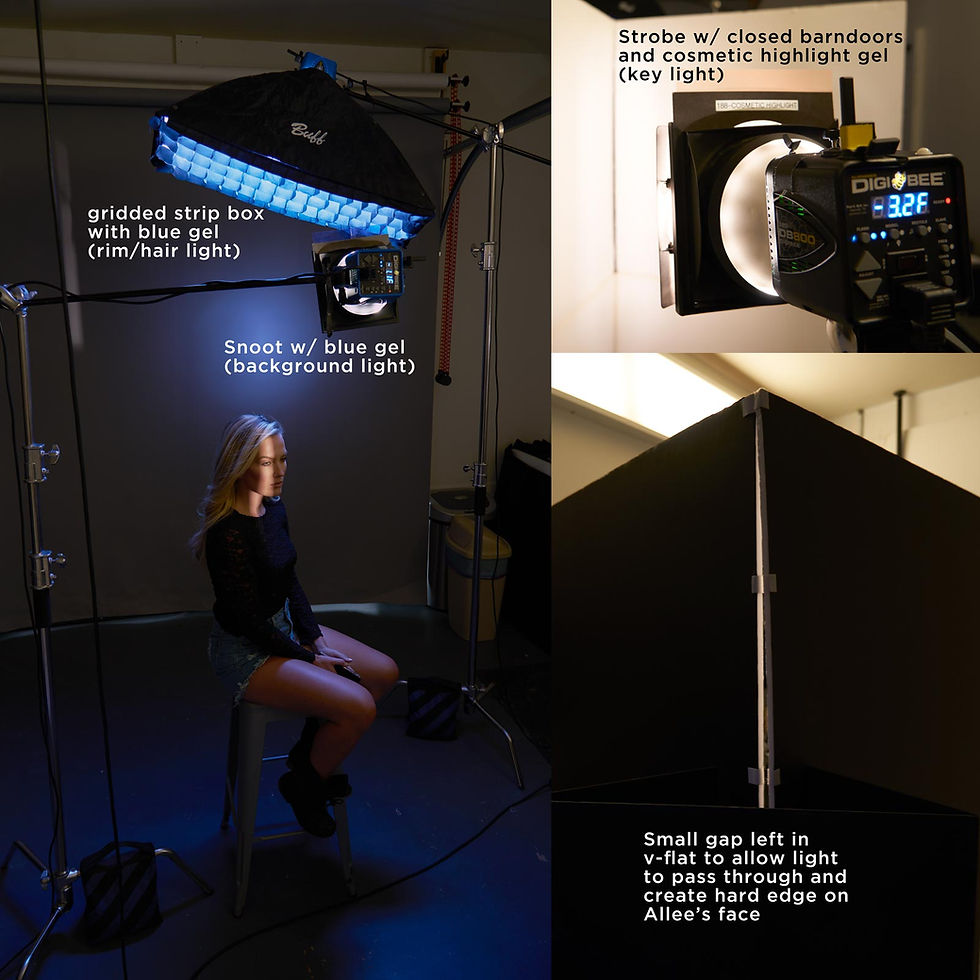
I used 3 lights for this image my key light was a Paul C. Buff Digibee shining through a V-Flat World v-flat that I purposely left open a little to allow some light to pass through and create the hard line on Allee's face. One thing you'll notice is that I also had some barn doors on the key light that were almost completely shut, so excess light wasn't bouncing around everywhere. I could have use another v-flat or something else to flag the light, but the barn doors are really easy to setup and aren't cumbersome if I wanted to rearrange my setup.
The second light I used was another Digibee with a gridded strip box and a blue gel inside. If you want to know how I gelled the light, check out this video here. The purpose of the second light was to act as a rim light and slightly illuminate her face as well. I used a grid so that no light would spill onto areas of the image that I didn't want, like the background.
That brings me to the third and final light, the background light. For this light, I had a snoot and another blue gel to add some controlled light onto the background.
The Gels
I chose to shoot with an analogous color scheme to amplify the mood of the image. If I had shot with complementary colors the image wouldn't have had nearly the impact that I wanted. That's why I chose to shoot with blue gels for both the rim light and the background light.
For the key light, I decided to use a Cosmetic Highlight gel to warm up Allee's natural skin tone. I could have easily kept the neutral strobe color, but that would have created a much cooler overall image and her face would have blended in too much with the background. The subtle addition of the gel helped retain a natural look so when I color corrected in capture one, I had a lot more control.
The Gear
Here's a list of the gear that I used during the shoot, and to film the BTS video that you'll find below.
Check out the images straight out of camera side by side so you can see the effect each light has on the image.
Key Light

Key Light w/ Barn Doors Open (notice the light isn't nearly as focused)

Key Light & Rim Light

All Lights

...And here's the final image that is retouched and color graded with Capture One Pro.

If you learn better by watching, here's a tutorial video from the shoot
If you're serious about taking your photography to the NEXT LEVEL, join me for a 1:1 workshop, virtual or in person and download your FREE lighting guide HERE.
Until next time!
-Jeff Carpenter


Comments